

By Joel Neubeck
This article describes the process of overlaying a Watermark image on top of a photograph using GDI+ and C# for .NET
原文链接:http://www.codeproject.com/csharp/watermark.asp
翻译:小新0574
声明:由于小新0574水平有限,并不能保证翻译十分流畅,但已经尽力保证意义上的准确,如果有翻译上的差错,请大家再回复中指出,谢谢。
Introduction
Often when placing photographic images on a website it is necessary to permanently overlay a watermark and/or Copyright statement on top of that image. Such an insertion helps to identify the person that took the photograph and indicate the organization that holds the Copyright. Doing this task by hand can become time consuming and is often inconsistent. Using some simple techniques there is an easy way to accomplish this programmatically using C# and GDI+.
常常在网站上放一张照片的时候,就需要放上一个持久的水印 和/或 版权声明在图片顶部。这样的一个插入帮助认识拍摄照片的人以及指出拥有版权的组织。手动做这项任务比较浪费时间,往往(多次插入)不一致。使用一些简单的编程技术(比如)C#和GDI+就可以完成这项任务。
Overview
I am going to show you a variety of techniques for manipulating an image. The following is a high level list of some of those techniques:
我将为你展示操作图片的各种各样的技术。以下是这些技术的high level list:
- Inserting text on top of an image positioned relative to the size on an image
- Dynamically choosing a System.Drawing.Font size to maximize readability
- Manipulating the opacity of a String of text
- Replacing a specific color in a bitmap to achieve transparency
- Changing the opacity of an image through a 5x5 ColorMatrix
- 根据图片大小在图片顶部插入文本
- 动态选择一个System.Drawing.Font大小以达到最大的可读性
- 操作字符串文本的不透明性
- 在位图上替换一种特定的颜色以达到透明效果
- 在一个5x5彩色矩阵上改变图片的透明度
Define Images
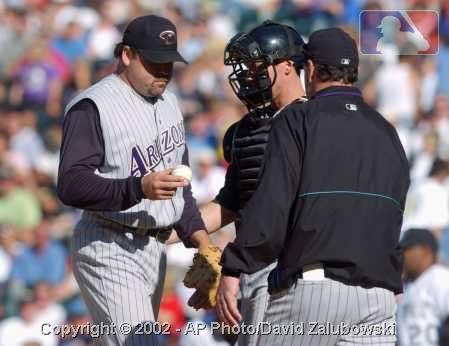
(Photo courtesy of AP wire)
(The first step in this process is to load a photographic image for which you would like to apply the watermark. This image can be virtually any size and resolution. For this example we will use an image that has a width of 449 pixels and a height of 346. The resolution is 72 dpi.
过程中的第一步是载入你想应用水印的图片。图片实际上可以是任何大小和分辨率。这个例子里我们将使用一张449像素宽346像素高的图片,分辨率是72dpi。)
When the Main method is instantiated, the two variable of type string are defined. The first will define where to find the photograph, watermark and output the new image. The second will define the Copyright string we will use as part of our watermark.
当主函数被实例化,定义了两个string类型变量。第一个将定义哪里去找照片,水印和输出新图片(的位置)。第二个将定义要用来作为我们的水印的一部分的版权字符串。
 string WorkingDirectory = @"C:\Projects\WaterMark";string Copyright = "Copyright © 2002 - AP Photo/David Zalubowski";
The following creates an Image object from the specified file and then defines a variable for both its Width and Height. These dimensions are then used to build a Bitmap object with a 24 bits per pixel format for the color data. Lastly this Bitmap is then used to create a new Graphics object from the specified Bitmap image.
以下(代码)从一个指定文件创建了一个Image 对象,然后为它的 Width 和 Height定义变量。这些长度待会被用来建立一个以24 bits 每像素的格式作为颜色数据的Bitmap对象。
Image imgPhoto = Image.FromFile(WorkingDirectory + "\\watermark_photo.jpg");int phWidth = imgPhoto.Width; int phHeight = imgPhoto.Height;Bitmap bmPhoto = new Bitmap(phWidth, phHeight, PixelFormat.Format24bppRgb);bmPhoto.SetResolution(72, 72); Graphics grPhoto = Graphics.FromImage(bmPhoto);![]()
(Image courtesy of MLB.com)
这个代码载入水印图片,水印图片已经被保存为一个BMP文件,以绿色(A=0,R=0,G=255,B=0)作为背景颜色。再一次,会为它的Width 和Height定义一个变量。
Image imgWatermark = new Bitmap(WorkingDirectory + "\\watermark.bmp");int wmWidth = imgWatermark.Width;int wmHeight = imgWatermark.Height;Step #1 - Watermark Text
This code draws the imgPhoto to the Graphics object positioning it (x= 0,y=0) at 100% of its original size. All future drawing will occur on top of the original photograph.
这个代码以100%它的原始大小绘制imgPhoto 到Graphics 对象的(x=0,y=0)位置。以后所有的绘图都将发生在原来照片的顶部。
grPhoto.SmoothingMode = SmoothingMode.AntiAlias;grPhoto.DrawImage( imgPhoto, new Rectangle(0, 0, phWidth, phHeight), 0, 0, phWidth, phHeight, GraphicsUnit.Pixel);
To maximize the size of the Copyright message we will test 7 different Font sizes to determine the largest possible size we can use for the width of our Photograph. To effectively do this, we will define an array of integers then iterate through those values measuring the Copyright string in the various point sizes. Once we have determined the largest possible size we will exit the loop and draw the text.
为了最大化版权信息的大小,我们将测试7种不同的字体大小来决定我们能为我们的照片宽度使用的可能的最大大小。为了有效地完成这个,我们将定义一个整型数组,接着遍历这些整型值测量不同大小的版权字符串。一旦我们决定了可能的最大大小,我们就退出循环,绘制文本。
 int[] sizes = new int[]{16,14,12,10,8,6,4};
 Font crFont = null; SizeF crSize = new SizeF(); for (int i=0 ;i<7; i++){
  crFont = new Font("arial", sizes[i], FontStyle.Bold); crSize = grPhoto.MeasureString(Copyright, crFont); if((ushort)crSize.Width < (ushort)phWidth) break;
 }
}Since all photographs will have varying heights, determine a position 5% from the bottom of the image. Use the Copyright strings height to determine an appropriate y-coordinate for which to draw the string. Determine its x-coordinate by calculating the centre of the image then define a StringFormat object and set the StringAlignment to Center.
因为所有的照片都有各种各样的高度,所以就决定了从图象底部开始的5%的位置开始。使用Copyright字符串的高度来决定绘制字符串合适的Y坐标轴。通过计算图像的中心来决定X轴,然后定义一个StringFormat 对象,设置StringAlignment 为Center。
int yPixlesFromBottom = (int)(phHeight *.05);float yPosFromBottom = ((phHeight - yPixlesFromBottom)-(crSize.Height/2));float xCenterOfImg = (phWidth/2);StringFormat StrFormat = new StringFormat();StrFormat.Alignment = StringAlignment.Center;Now that we have all of the necessary positioning coordinates create a SolidBrush with a Color of 60% Black (alpha value of 153). Draw the Copyright string at the appropriate position offset 1 pixel to the right and 1 pixel down. This offset will create a shadow effect. Repeat this process using a White Brush drawing the same text directly on top of the previously drawn string.
现在我们已经有了所有所需的位置坐标来使用60%黑色的一个Color(alpha值153)创建一个SolidBrush 。在偏离右边1像素,底部1像素的合适位置绘制版权字符串。这段偏离将用来创建阴影效果。使用Brush重复这样一个过程,在前一个绘制的文本顶部绘制同样的文本。
SolidBrush semiTransBrush2 = new SolidBrush(Color.FromArgb(153, 0, 0,0)); grPhoto.DrawString(Copyright, crFont, semiTransBrush2, new PointF(xCenterOfImg+1,yPosFromBottom+1), StrFormat);SolidBrush semiTransBrush = new SolidBrush( Color.FromArgb(153, 255, 255, 255));grPhoto.DrawString(Copyright, crFont, semiTransBrush, new PointF(xCenterOfImg,yPosFromBottom), StrFormat);
Step #2 - Watermark Image
Create a Bitmap based on the previously modified photograph. Load this Bitmap into a new Graphic Object
根据前面修改后的照片创建一个Bitmap。把这个Bitmap载入到一个新的Graphic对象。
Bitmap bmWatermark = new Bitmap(bmPhoto); bmWatermark.SetResolution( imgPhoto.HorizontalResolution, imgPhoto.VerticalResolution);Graphics grWatermark = Graphics.FromImage(bmWatermark);To achieve a translucent watermark we will apply two color manipulations by defining an ImageAttributes object and setting two of its properties. The first step in manipulating the watermark image is to replace the background color with one that is transparent (Alpha=0, R=0, G=0, B=0). To do this we will use a Colormap and define a RemapTable. As previously shown my watermark was defined with a background of 100% Green this will be the color we search for and replace with transparency.
通过定义一个ImageAttributes 对象并设置它的两个属性,我们就是实现了两个颜色的处理,以达到半透明的水印效果。处理水印图象的第一步是把背景图案变为透明的(Alpha=0, R=0, G=0, B=0)。我们使用一个Colormap 和定义一个RemapTable来做这个。就像前面展示的,我的水印被定义为100%绿色背景,我们将搜到这个颜色,然后取代为透明。
ImageAttributes imageAttributes = new ImageAttributes();ColorMap colorMap = new ColorMap();colorMap.OldColor=Color.FromArgb(255, 0, 255, 0);colorMap.NewColor=Color.FromArgb(0, 0, 0, 0);ColorMap[] remapTable = {colorMap};imageAttributes.SetRemapTable(remapTable, ColorAdjustType.Bitmap);The second color manipulation is used to change the opacity of the watermark. This is done by applying a 5x5 matrix that contains the coordinates for the RGBA space. By setting the 3rd row and 3rd column to
第二个颜色处理用来改变水印的不透明性。通过应用包含提供了坐标的RGBA空间的5x5矩阵来做这个。通过设定第三行、第三列为
float[][] colorMatrixElements = {  new float[] {1.0f, 0.0f, 0.0f, 0.0f, 0.0f},
 new float[] {0.0f, 1.0f, 0.0f, 0.0f, 0.0f}, new float[] {0.0f, 0.0f, 1.0f, 0.0f, 0.0f}, new float[] {0.0f, 0.0f, 0.0f, 0.3f, 0.0f}, new float[] {0.0f, 0.0f, 0.0f, 0.0f, 1.0f}};ColorMatrix wmColorMatrix = new ColorMatrix(colorMatrixElements);imageAttributes.SetColorMatrix(wmColorMatrix, ColorMatrixFlag.Default, ColorAdjustType.Bitmap);
With both color manipulations added to the imageAttributes object we can now draw the watermark in the upper right hand corner of the photograph. We will offset the image 10 pixels down and 10 pixels to the left.
随着两个颜色处理加入到imageAttributes 对象,我们现在就能在照片右手边上绘制水印了。我们会偏离10像素到底部,10像素到左边。
int xPosOfWm = ((phWidth - wmWidth)-10);int yPosOfWm = 10;grWatermark.DrawImage(imgWatermark, new Rectangle(xPosOfWm,yPosOfWm,wmWidth, wmHeight), 0, 0, wmWidth, wmHeight, GraphicsUnit.Pixel, imageAttributes);
Or last and final step will be to replace the original Image with the new Bitmap, dispose of both Graphic objects then save this Image to the file system.
最后的步骤将是使用新的Bitmap取代原来的Image。 销毁两个Graphic对象,然后把Image 保存到文件系统。
imgPhoto = bmWatermark;grPhoto.Dispose();grWatermark.Dispose();\\watermark_final.jpg", imgPhoto.Save(WorkingDirectory + " ImageFormat.Jpeg);imgPhoto.Dispose();imgWatermark.Dispose();That's it! Compile the project, run it, and see what happens! The code is fairly straightforward if it all makes sense then these techniques can be used for 100's of different image manipulations. The possibilities are endless.
就是它了!编译工程,运行它,看看发生了什么!如果代码都按步骤作了,它会是清楚易懂的,然后这些技术能被用作100种不同的图像操作。可能是无限的。
Revision History
26 Sep 2002 - Initial Revision
2002年9月26号 – 初次修改
About Joel Neubeck
Joel is a Software Engineer with a Fortune 500 media company. He started programming in 1996 as a consultant and has spent most of his time involved in Web Application Development (IIS, ASP, VB). His latest projects have focused on C# and .NET where he has written various API and Console based applications for use in the media industry.
In his free time, he enjoys Mountain Biking through out
Joel是Fortune 500媒体公司的软件工程师。他在1996年作为一个顾问开始编程,大多数时间花在了Web Application Development (IIS, ASP, VB).他最新的项目集中在C#和.NET,他已经使用C#和.NET为多媒体工业写了各种各样的 API和控制台程序。
在他的空闲时间,他喜欢骑着山地自行车穿越亚利桑那州,还跟他妻子跟两支狗共度时光。

